목록
- HTML (Hyper Text Markup Language - 하이퍼 텍스트 마크업 랭귀지)
- 화면구성 이해하기
- HTML 시작해보기 - Say Hello to HTML Elements
- 제목글 만들어보기 - Headline with the h2 Element
- 일반 문장 넣어보기 - Inform with the Paragraph Element
- 임시의 문장 넣어보기 - Fill in the Blank with Placeholder Text
- 언코멘트 살펴보기 - Uncomment HTML
- 코멘트 만들기 - Comment out HTML
- 엘레먼트 지우기 - Delete HTML Elements
- HTML5 엘레먼트 소개 - Introduction to HTML5 Elements
- 웹사이트에 이미지 추가하기 - Add Images to Your Website
- 다른 페이지로 가는 링크 추가하기 - Link to External Pages with Anchor Elements
- 웹 페이지의 특정 부분으로 가는 링크 만들기 - Link to Internal Sections of a Page with Anchor Elements
- 문장 안에 있는 단어에 링크 걸기 - Nest an Anchor Element within a Paragraph
- 임시로 미작동 링크 만들기 - Make Dead Links Using the Hash Symbol
- 이미지에 링크 걸기 - Turn an Image into a Link
- 글머리표 만들기 - Create a Bulleted Unordered List
- 번호 목록 만들기 - Create an Ordered List
- 텍스트 필드 만들기 - Create a Text Field
- 텍스트 필드에 임시 텍스트 넣기 - Add Placeholder Text to a Text Field
- 폼 만들기 - Create a Form Element
- 폼에 제출버튼 만들기 - Add a Submit Button to a Form
- 특정 필드를 필수사항으로 만들기 - Use HTML5 to Require a Field
- 라디오버튼 만들기 - Create a Set of Radio Buttons
- 체크박스 만들기 - Create a Set of Checkboxes
- 라디오버튼과 체크박스에 발류 속성 추가하기 - Use the value attribute with Radio Buttons and Checkboxes
- 라디오버튼과 체크박스에 기본값 넣기 - Check Radio Buttons and Checkboxes by Default
- 엘레먼트 안에 엘레먼트 넣기 - Nest Many Elements within a Single div Element
- HTML 문서의 타입 정하기 - Declare the Doctype of an HTML Document
- HTML 문서의 헤드와 보디 - Define the Head and Body of an HTML Document
- HTML을 끝마치며...
HTML (Hyper Text Markup Language - 하이퍼 텍스트 마크업 랭귀지)
하이퍼 텍스트 Hyper Text
글자에 링크를 연결했다고 생각하면 된다.
밑줄이 쳐진 freeCodeCamp를 클릭하면 다른 사이트로 가게 된다. 링크를 걸어놓은 텍스트를 하이퍼 텍스트라고 생각하면 편할 것 같다.
예시: HTML - 문장 내 특정 단어에 링크 삽입
<p>밑줄이 쳐진 <a href="http://freecodecamp.org" target="_blank" rel="noopener">freeCodeCamp</a>를 클릭하면 다른 사이트로 가게 된다.</p>마크업 랭귀지 Markup Language
글 수정할 때 사용하는 부호라고 생각하면 된다.
논문이나 보고서를 작성하면 "띄어쓰기", "붙여넣기", "이건 지워라" 등등의 표시로 수정을 하게 된다. 이런 표시를 마크업이라고 한다.
예시: HTML 코드 - 큰 제목 사용
<h3 data-ke-size="size23">마크업 랭귀지 Markup Language</h3>정리
HTML이란, 여러 문서를 연결해 놓은 하이퍼 텍스트와 문서의 기본 틀을 만드는 마크업 랭귀지를 함께 사용하는 코드라고 생각하면 된다.
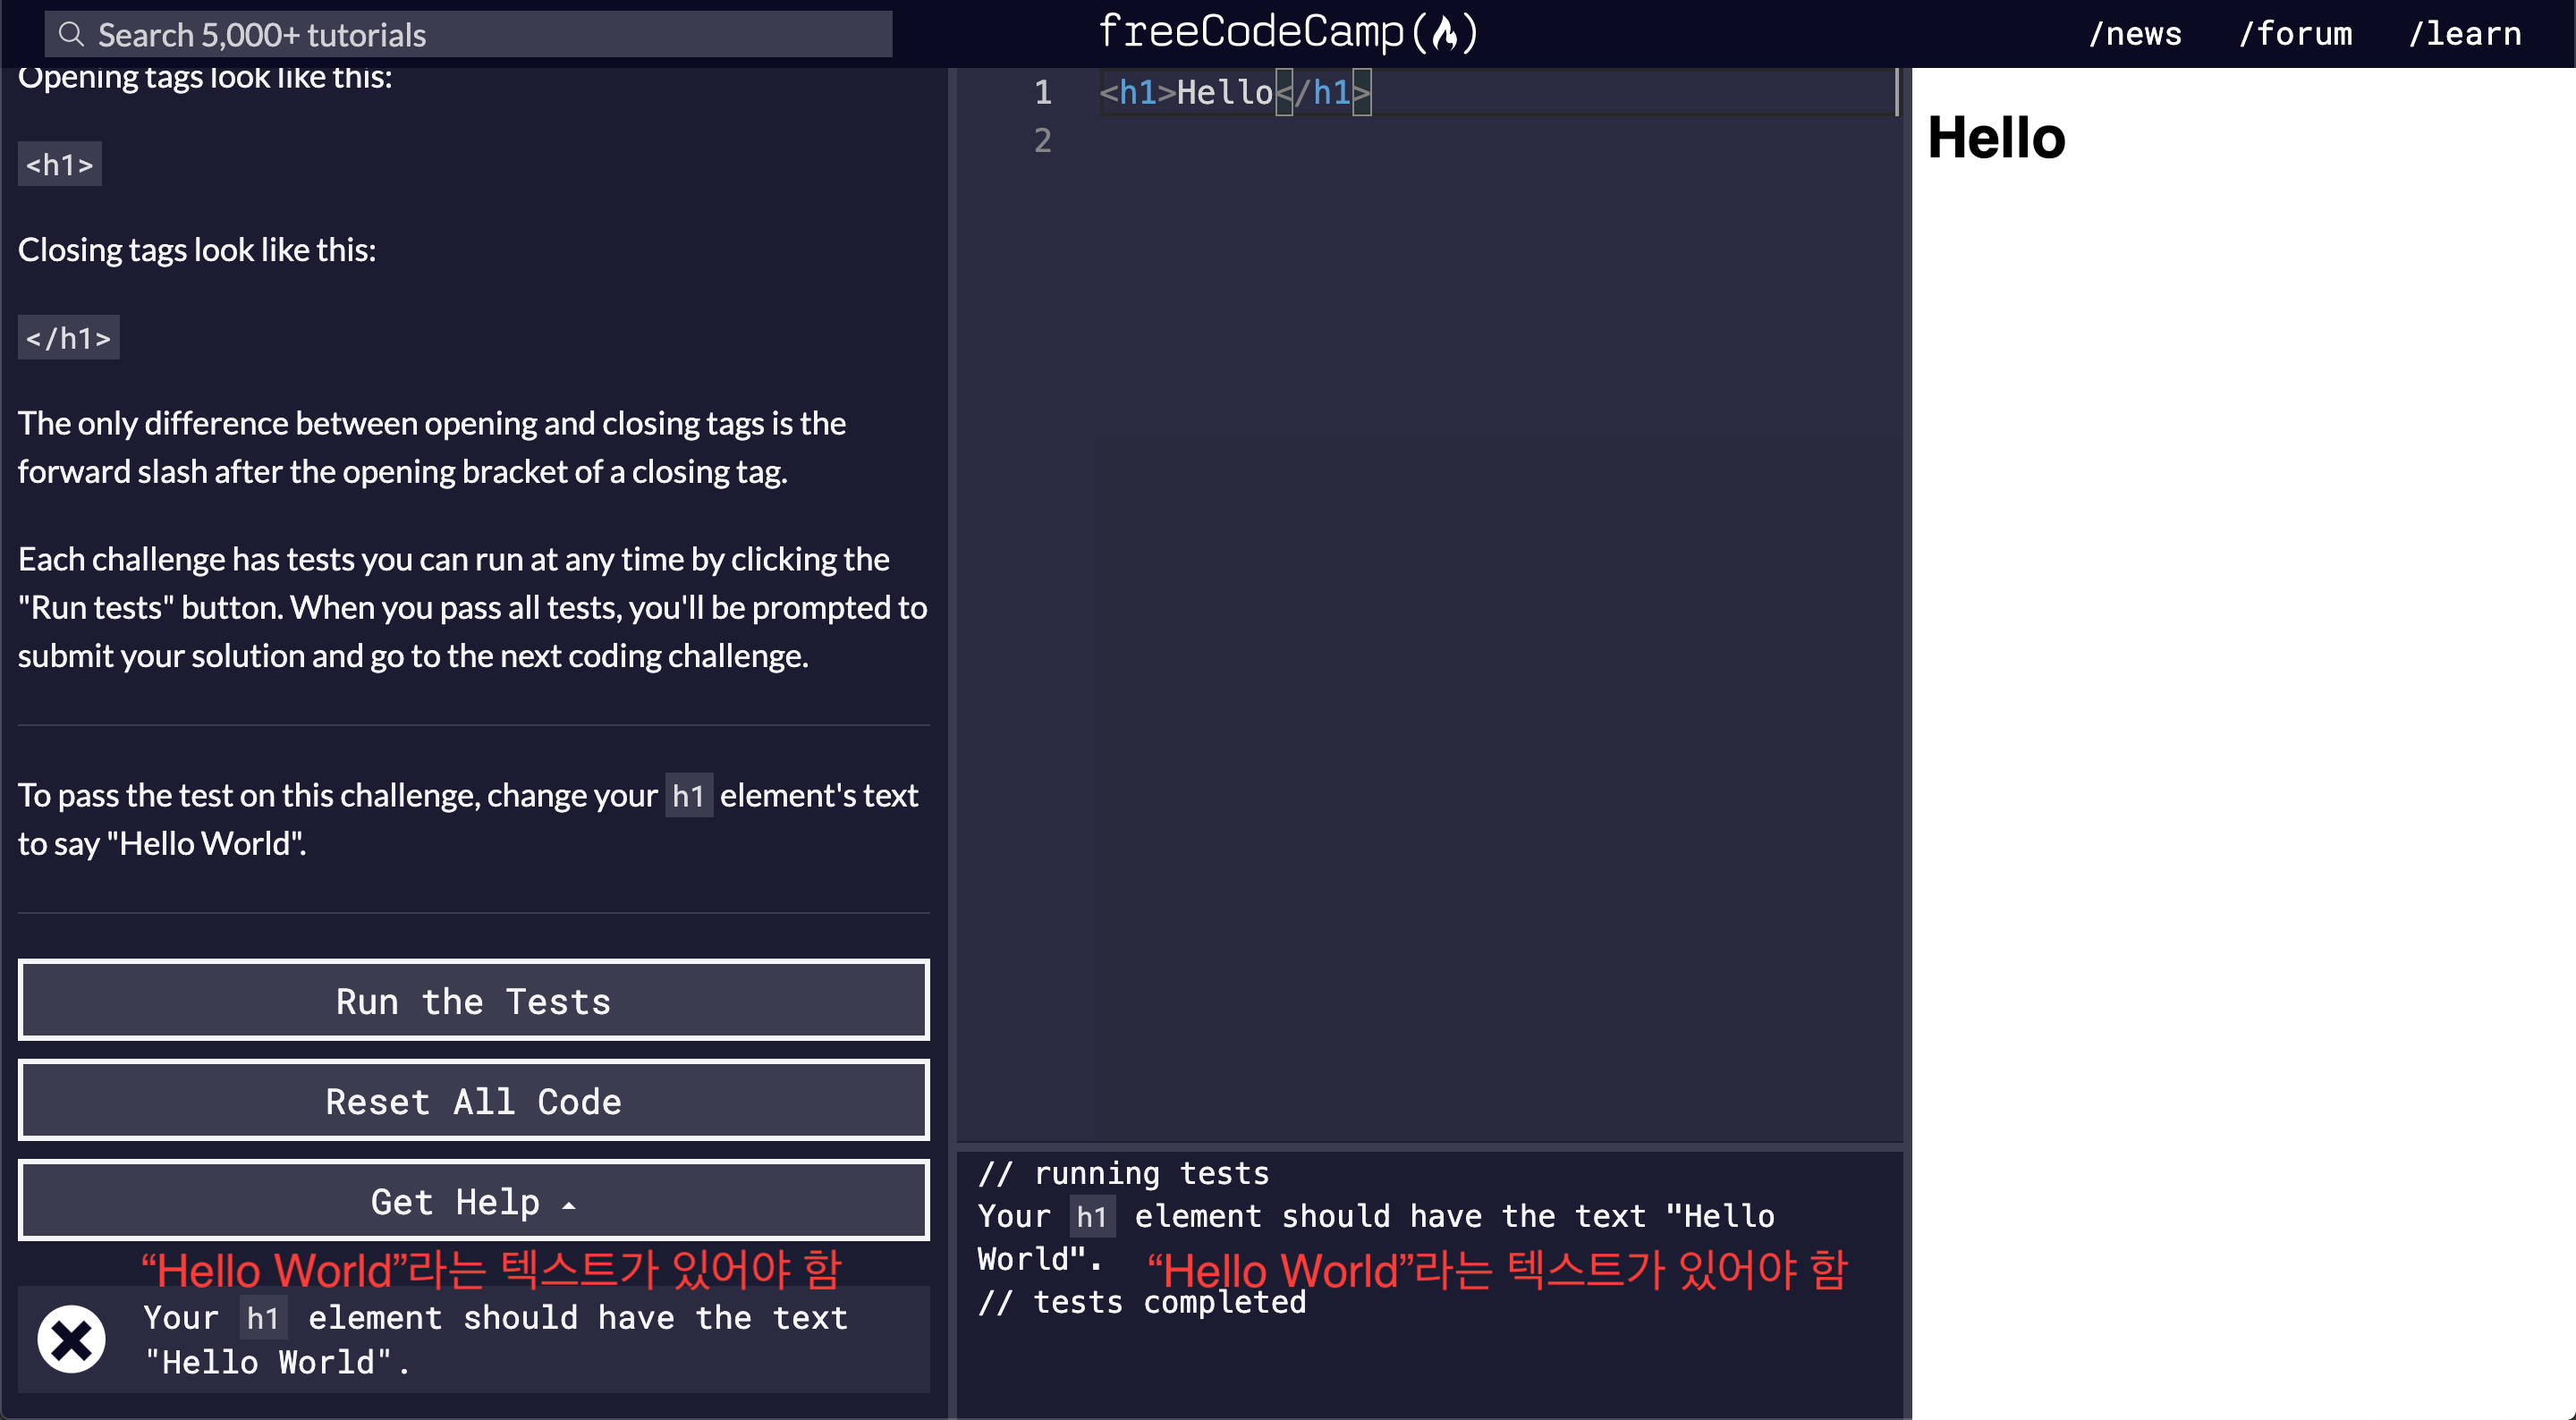
화면 구성 이해하기
아래 그림과 같이 왼쪽칸에는 설명과 문제가 있다.
가운데 칸에는 코드 에디터 (code editor)가 임베드(embed) 되어 있다. 임베드 됐다고 하면, 심어져 있는 거라고 생각하면 편할 것 같다.
코드 에디터에 코딩을 하면, 오른쪽 칸에 실제 결과물이 바로바로 나타난다.

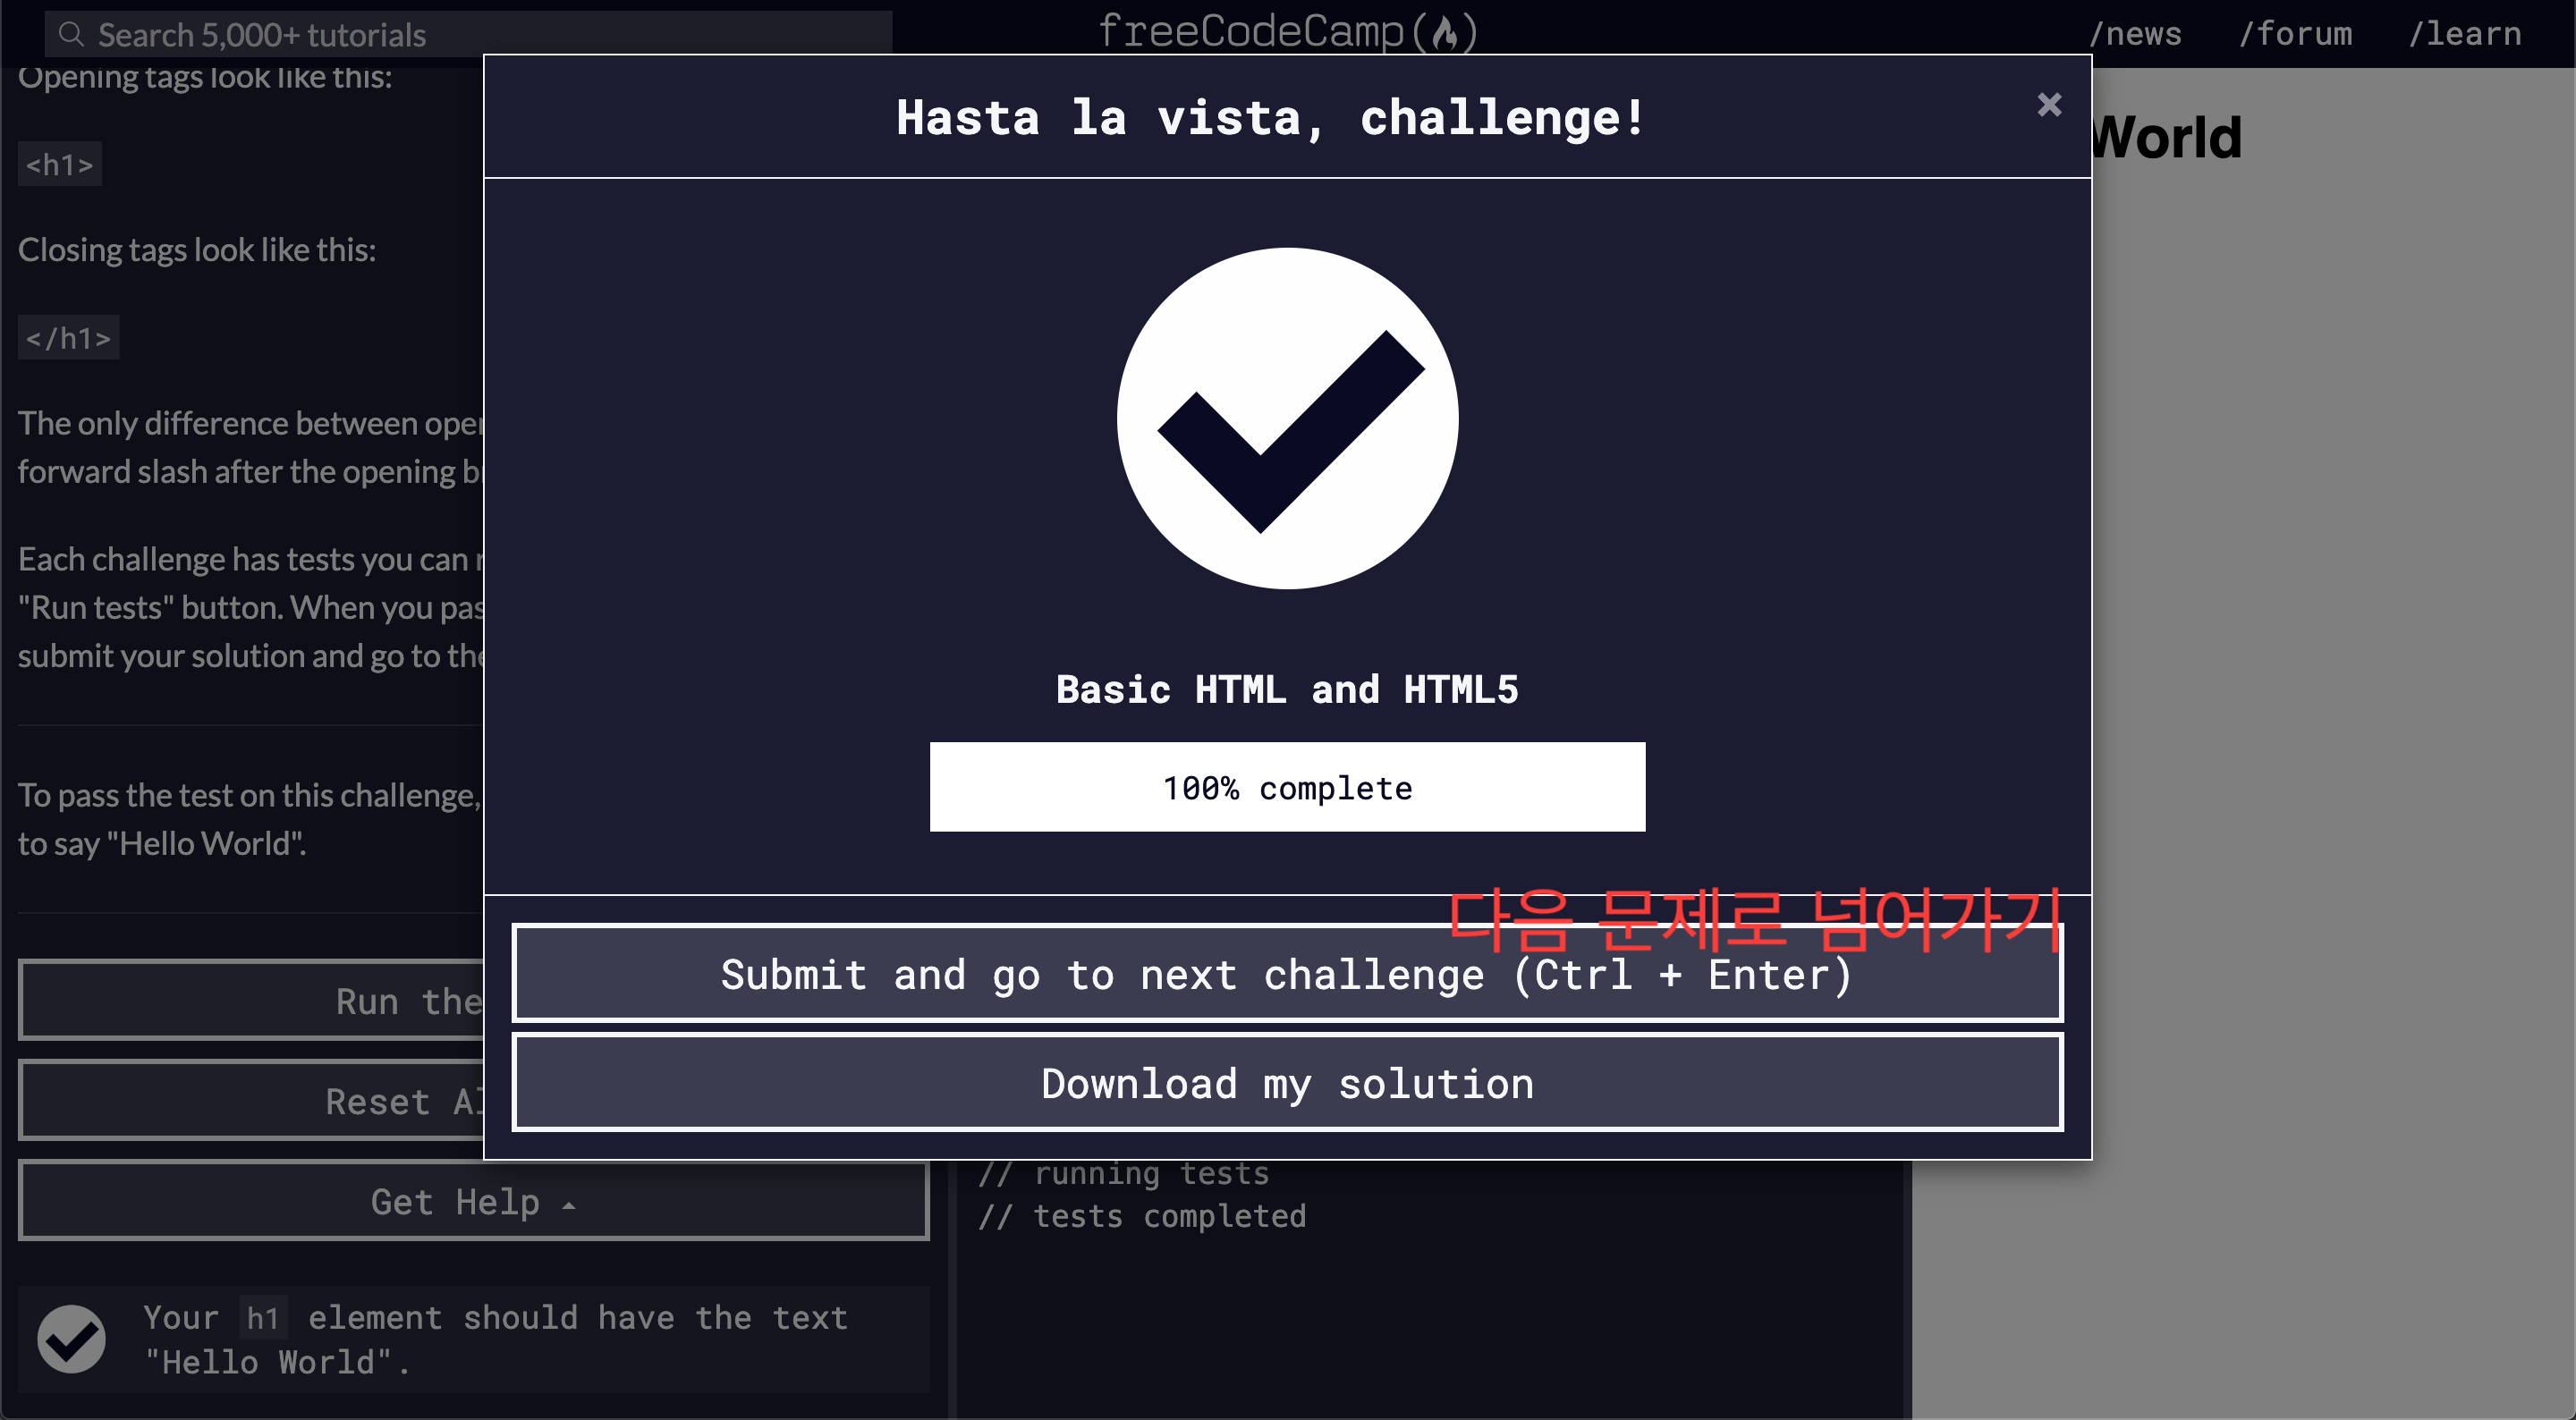
진행하는 방식은 다음과 같다:
1. 문제를 읽고, 코드 에디터에 코딩하기
2. Run the Tests(코드 테스트하기) 버튼 눌러, 답변 확인
모든 게 순조롭게 진행된다면, 아래와 같은 화면이 뜬다. 버튼을 눌르거나, 컨트롤 + 엔터키를 치면 다음 문제로 넘어간다.
문제를 틀릴 경우에는 아래와 같은 화면이 뜬다. 문제칸과 코드 에디터 칸에 무엇을 해야 하는지 설명이 되어 있다.
Say Hello to HTML Elements
HTML 시작해보기
설명
코드 에디터에는 이미 아래와 같은 코드가 작성되어 있다.
<h1>Hello</h1>
결과창에는 다음과 같은 간단한 결과물이 나온다.
Hello
HTML 엘레먼트에는 대부분 오프닝 태그 (opening tag)와 클로징 태그 (closing tag)가 함께 있다.
여기서 <h1>이 오프닝 태그, </h1>이 클로징 태그다.
오프닝 태그와 클로징 태그 사이에 텍스트를 적으면, 텍스트가 결과창에 나타난다.
문제
h1 엘레먼트를 사용하여, 아래의 텍스트가 결과창에 나타나도록 작성해보자.
Hello World
답변
<h1>Hello World</h1>Headline with the h2 Element
제목글 만들어보기
설명
이번에는 h2 엘레먼트를 사용하여 헤딩 레벨2 (level two heading)을 웹페이지에 추가해보자.
헤딩 엘레먼트는 텍스트를 제목 크기로 만들어주는 엘레먼트이다.
h1 엘레먼트는 보통 큰 제목에 사용한다.
h2 엘레먼트는 보통 부제목에 사용한다.
h3, h4, h5, h6와 같이 더 작은 부제목을 사용할 수도 있다.
문제
1. h1 엘레먼트를 사용한 Hello World 아래에, 두 번째 엘레먼트를 추가해보자.
2. h2 엘레먼트를 사용하여, 아래 텍스트를 추가해보자.
CatPhotoApp
답변
<h1>Hello World</h1>
<h2>CatPhotoApp</h2>
Inform with the Paragraph Element
일반 문장 넣어보기
설명
p 엘레먼트는 일반 텍스트를 작성할 때 사용한다.
패래그래프(paragraph, 문장)라는 의미다.
p 엘레먼트도 h1 엘레먼트와 같은 방식으로 사용하면 된다.
문제
h2 엘레먼트 아래 p 엘레먼트를 사용하여, 아래 텍스트를 추가해보자.
Hello Paragraph
답변
<h1>Hello World</h1>
<h2>CatPhotoApp</h2>
<p>Hello Paragraph</p>
Fill in the Blank with Placeholder Text
임시의 문장 넣어보기
설명
웹 개발자는 로렘 입섬 (lorem ipsum) 텍스트를 임시 문장 (placeholder)으로 사용한다.
로렘 입섬 텍스트는 고대 로마 정치가/철학자/웅변가 키케로의 유명한 구절에서 무작위로 따온 것이다.
로렘 입섬 텍스트는 16세기부터 타자 치는 타입 세팅하는 사람들 (typesetter)이 임시 문장으로 사용해 왔던 텍스트다.
웹에서도 이 전통을 이어간다.
5세기 동안 사용해왔다니 너무 오래됐다.
우리는 키티 (새끼 고양이) 로렘 입섬 텍스트를 사용해 보자.
문제
p 엘레먼트 안에 있는 텍스트를 아래 텍스트로 바꿔보자.
Kitty ipsum dolor sit amet, shed everywhere shed everywhere stretching attack your ankles chase the red dot, hairball run catnip eat the grass sniff.
답변
<h1>Hello World</h1>

<h2>CatPhotoApp</h2>

<p>Kitty ipsum dolor sit amet, shed everywhere shed everywhere stretching attack your ankles chase the red dot, hairball run catnip eat the grass sniff.</p>
문장 전체를 전부 붙여넣기 하지 않아도 된다. 영문 문제에서는 "첫 몇 단어"라고 하였으니 말이다.
두 단어 (Kitty ipsum)만 써도 통과되는 것을 확인했다.
Uncomment HTML
언코멘트 살펴보기
설명
코멘트를 남긴다는 것은,
나 자신이나 다른 개발자가 확인할 만한 내용을 코딩 상에 남기는 것이다.
엔드 유저 (end user - 화면을 보는 사용자)는 실제 결과가 나오는 화면에서는 보지 못 한다.
어떤 코드를 비활성화 시킬 수 있는 방법이기도 하다. 지웠다가 다시 쓸 필요가 없는 것이다.
HTML에서 코멘트를 남기는 방법은,
<!-- 로 시작하여 --> 로 끝내는 것이다.
문제
h1, h2, p 엘레먼트 모두 현재 코멘트를 사용하여, 코드가 비활성화 된 상태이다.
코멘트를 지워 코드를 다시 활성화 시켜보자.
답변
<h1>Hello World</h1>

<h2>CatPhotoApp</h2>

<p>Kitty ipsum dolor sit amet, shed everywhere shed everywhere stretching attack your ankles chase the red dot, hairball run catnip eat the grass sniff.</p>
가장 첫 줄(<!--)과 마지막 줄(-->만 지우고, 위와 같이 나머지만 그대로 남겨두면 된다.
Comment out HTML
코멘트 만들기
설명
다시 한 번 정리해보자.
코멘트를 시작하려면, <!-- 로 시작해야 한다. 끝내려면 --> 로 한다.
문제
1. h1과 p 엘레먼트를 코멘트로 만들어보자.
2. h2 엘레먼트만 결과창에 나타나야 한다.
답변
<!--
<h1>Hello World</h1>
-->
<h2>CatPhotoApp</h2>
<!--
<p>Kitty ipsum dolor sit amet, shed everywhere shed everywhere stretching attack your ankles chase the red dot, hairball run catnip eat the grass sniff.</p>
-->
Delete HTML Elements
엘레먼트 지우기
설명
이제는 필요없는 내용은 지워보자.
문제
h1 엘레먼트를 지워보자.
답변
<h2>CatPhotoApp</h2>

<p>Kitty ipsum dolor sit amet, shed everywhere shed everywhere stretching attack your ankles chase the red dot, hairball run catnip eat the grass sniff.</p>
Introduction to HTML5 Elements
HTML5 엘레먼트 소개
설명
HTML5에는 더 기술적인 태그를 포함시켰다.
메인(main), 헤더(header), 풋터(footer), 내브(nav), 비디오(video), 아티클(article), 섹션(section) 등이다.
이러한 태그는 HTML을 더 구조적으로 구성할 수 있다.
눈으로 읽기도 더 쉽다.
검색엔진최적화(SEO - Search Engine Optimization)와 접근성(accessibility)에도 도움이 된다.
메인 엘레먼트를 예로 들어보자.
아래에는 h1과 p 엘레먼트를 메인 태그 구조 안에 구성한 것이다.
<main>
  <h1>Hello World</h1>
  <p>Hello Paragraph</p>
</main>
참고: HTML5에는 새로운 태그가 많다. 어떤 역할을 하는지는 접근성 응용 부문 (applied accessibility section)에서 설명할 것이다.
문제
1. p 엘레먼트 아래, 두 번째 p 엘레먼트를 추가해보자. 아래 텍스트를 사용하면 된다.
Purr jump eat the grass rip the couch scratched sunbathe, shed everywhere rip the couch sleep in the sink fluffy fur catnip scratched.
2. 그리고 메인 엘레먼트로 p 엘레먼트 두 개를 모두 감싸보자.
답변
<h2>CatPhotoApp</h2>
<main>
<p>Kitty ipsum dolor sit amet, shed everywhere shed everywhere stretching attack your ankles chase the red dot, hairball run catnip eat the grass sniff.</p>
<p>Purr jump eat the grass rip the couch scratched sunbathe, shed everywhere rip the couch sleep in the sink fluffy fur catnip scratched.</p>
</main>
Add Images to Your Website
웹사이트에 이미지 추가하기
설명
img 엘레먼트를 사용하여 웹사이트에 이미지를 넣을 수 있다.
여기서 src 속성(attribute)을 사용하여, 원하는 특정 이미지의 URL을 가리킬 수 있다.
예는 아래와 같다.
<img src="https://www.your-image-source.com/your-image.jpg">
참고: img 엘레먼트는 클로징 엘레먼트가 필요없다. 셀프 크로징 (self-closing)이라 한다.
img 엘레먼트에는 꼭 alt 속성이 있어야 한다.
alt 속성 안에 들어가는 텍스트는 이미지 로딩이 안 되었을 때, alt 속성에 써진 설명으로 대신 이해할 수 있다.
참고: 사진이 무언가 설명하는 용도가 아닌 디자인이나 장식용이라면, alt 속성을 비워두는 것이 가장 좋은 사용 방법이다.
필요하지 않다면, alt 속성에는 특수문자를 넣지 않는 것이 좋다.
위의 예에 alt 속성을 넣으면 다음과 같이 된다.
<img src="https://www.your-image-source.com/your-image.jpg" alt="Author standing on a beach with two thumbs up.">
문제
1. main과 p 엘레먼트 사이에 img 엘레먼트를 넣어보자.
2. 그리고 src 속성은 다음의 url을 가리켜 보자.
https://bit.ly/fcc-relaxing-cat
alt 속성을 넣는 것도 잊지 말자.
답변
<h2>CatPhotoApp</h2>
<main>
<img src="https://bit.ly/fcc-relaxing-cat" alt="고양이가 누워있다.">
  <p>Kitty ipsum dolor sit amet, shed everywhere shed everywhere stretching attack your ankles chase the red dot, hairball run catnip eat the grass sniff.</p>
  <p>Purr jump eat the grass rip the couch scratched sunbathe, shed everywhere rip the couch sleep in the sink fluffy fur catnip scratched.</p>
</main>
alt 속성에 한글을 넣어도 무방하다.
Link to External Pages with Anchor Elements
다른 페이지로 가는 링크 추가하기
설명
a 엘레먼트 (앵커 anchor - 닻을 내리다, 정박하다)를 사용하면, 다른 웹 페이지의 링크 (외부 링크)를 걸 수 있다.
a 엘레먼트에는 href 속성이 필요하다. 여기에 웹 주소를 넣으면 된다. 앵커 텍스트도 함께 넣어주면 된다.
아래는 앵커를 사용한 예이다.
<a href="https://freecodecamp.org">this links to freecodecamp.org</a>
여기서 this links to freecodoecamp.org 라는 텍스트를 클릭하면, href 속성의 주소인 https://freecodecamp.org로 갈 수 있다.
문제
1. a 엘레먼트를 사용해보자.
2. 외부 링크는 http://freecatphotoapp.com을 사용한다.
3. 앵커 텍스트로는 cat photos라고 적어보자.
답변
<h2>CatPhotoApp</h2>
<main>
  <a href="http://freecatphotoapp.com">cat photos</a>


  <img src="https://bit.ly/fcc-relaxing-cat" alt="A cute orange cat lying on its back.">

  <p>Kitty ipsum dolor sit amet, shed everywhere shed everywhere stretching attack your ankles chase the red dot, hairball run catnip eat the grass sniff.</p>
  <p>Purr jump eat the grass rip the couch scratched sunbathe, shed everywhere rip the couch sleep in the sink fluffy fur catnip scratched.</p>
</main>
Link to Internal Sections of a Page with Anchor Elements
웹 페이지의 특정 부분으로 가는 링크 만들기
설명
a(앵커) 엘레먼트는 한 페이지 내에서 다른 부분으로 옮겨갈 때도 사용할 수 있다. 이 페이지 상위 목록도 앵커 엘레먼트를 사용하여 만들었다.
내부 링크 (internal link)를 만들려면, href 속성에 #(해쉬) 심볼을 제일 앞에 추가해주면 된다.
그런 다음, 내부 링크를 클릭했을 때 옮겨갈 텍스트에 id 속성을 적어주면 된다. 여기서는 해쉬 심볼을 빠진다.
어떤 엘레먼트에 id 속성을 추가하면, 나중에 그 id를 사용하여 다른 방식으로도 사용할 수 있다.
아래는 href에 해쉬 심볼을 넣은 것, id를 사용한 것에 대한 예이다.
<a href="#contacts-header">Contacts</a>
...
<h2 id="contacts-header">Contacts</h2>
여기서 위에 있는 Contacts를 클릭하면, 아래 있는 Contacts로 화면이 이동한다.
문제
1. 외부 링크를 내부 링크로 바꿔보자.
2. href 속성은 #footer로 바꾸자.
3. 현재 텍스트는 cat photos로 되어 있다. Jump to Bottom으로 바꿔보자.
4. 앵커 태그에서 target="_blank" 속성은 삭제하자. 새 윈도우에 링크를 띄우는 방식이다.
5. 마지막으로, 페이지 가장 하단에 있는 footer 엘레먼트에 id 속성을 추가하자.
6. id는 href 속성에서 해쉬 심볼만 빼면 된다. 다시 말해, id는 footer로 설정하면 된다.
답변
<h2>CatPhotoApp</h2>
<main>

  <a href="#footer">Jump to Bottom</a>

  <img src="https://bit.ly/fcc-relaxing-cat" alt="A cute orange cat lying on its back.">

  <p>Kitty ipsum dolor sit amet, shed everywhere shed everywhere stretching attack your ankles chase the red dot, hairball run catnip eat the grass sniff. Purr jump eat the grass rip the couch scratched sunbathe, shed everywhere rip the couch sleep in the sink fluffy fur catnip scratched. Kitty ipsum dolor sit amet, shed everywhere shed everywhere stretching attack your ankles chase the red dot, hairball run catnip eat the grass sniff.</p>
  <p>Purr jump eat the grass rip the couch scratched sunbathe, shed everywhere rip the couch sleep in the sink fluffy fur catnip scratched. Kitty ipsum dolor sit amet, shed everywhere shed everywhere stretching attack your ankles chase the red dot, hairball run catnip eat the grass sniff. Purr jump eat the grass rip the couch scratched sunbathe, shed everywhere rip the couch sleep in the sink fluffy fur catnip scratched.</p>
  <p>Meowwww loved it, hated it, loved it, hated it yet spill litter box, scratch at owner, destroy all furniture, especially couch or lay on arms while you're using the keyboard. Missing until dinner time toy mouse squeak roll over. With tail in the air lounge in doorway. Man running from cops stops to pet cats, goes to jail.</p>
  <p>Intently stare at the same spot poop in the plant pot but kitten is playing with dead mouse. Get video posted to internet for chasing red dot leave fur on owners clothes meow to be let out and mesmerizing birds leave fur on owners clothes or favor packaging over toy so purr for no reason. Meow to be let out play time intently sniff hand run outside as soon as door open yet destroy couch.</p>

</main>

<footer id="footer">Copyright Cat Photo App</footer>
Nest an Anchor Element within a Paragraph
문장 안에 있는 단어에 링크 걸기
설명
문장 한 중간에 있는 텍스트에도 링크를 걸 수 있다. 아래는 그 예이다.
<p>
  Here's a <a target="_blank" href="http://freecodecamp.org"> link to freecodecamp.org</a> for you to follow.
</p>
이제 하나 하나 짚어보자.
1. 텍스트는 p 엘레먼트를 사용했다.
2. a(앵커) 엘레먼트로 링크를 걸었다. (링크가 끝나는 지점에 앵커 태그를 닫았다.)
3. target(타겟) 속성에는 "_blank"를 사용했다. 링크를 클릭하면 새 창이 뜬다.
4. href 속성으로는 프리코드캠프 URL을 넣었다. link to freecodecamp.org를 클릭하면, 새 창이 열리며 이 사이트로 이동한다.
5. 아래와 같은 식으로 말이다.
Here's a link to freecodecamp.org for you to follow.
문제
1. main 엘레먼트와 img 엘레먼트 사이에 수정을 좀 해보자.
2. 지금은 cat photos에만 링크가 걸려 있는 상태다.
3. cat photos에만 링크가 걸려있는 상태를 그대로 두되, 그 앞에 View more이라는 단어를 추가해보자.
답변
<h2>CatPhotoApp</h2>
<main>
  <p>View more
  <a href="http://freecatphotoapp.com" target="_blank">cat photos</a>
  </p>
  <img src="https://bit.ly/fcc-relaxing-cat" alt="A cute orange cat lying on its back.">

  <p>Kitty ipsum dolor sit amet, shed everywhere shed everywhere stretching attack your ankles chase the red dot, hairball run catnip eat the grass sniff.</p>
  <p>Purr jump eat the grass rip the couch scratched sunbathe, shed everywhere rip the couch sleep in the sink fluffy fur catnip scratched.</p>
</main>
Make Dead Links Using the Hash Symbol
임시로 미작동 링크 만들기
설명
실제 링크를 연결하기 전에, a 엘레먼트를 만들어 놔야 할 수도 있다.
나중에 배우겠지만, 자바스크립트(javascript)로 링크 작동 방식을 조절할 수 있다.
문제
현재 href 속성(attribute)에는 링크가 달려있다.
이 링크를 해쉬 심볼 (#)로 바꾸자. 작동하지 않는, 데드 링크로 만드는 것이다.
답변
<h2>CatPhotoApp</h2>
<main>
  <p>Click here to view more <a href="#" target="_blank">cat photos</a>.</p>

  <img src="https://bit.ly/fcc-relaxing-cat" alt="A cute orange cat lying on its back.">

  <p>Kitty ipsum dolor sit amet, shed everywhere shed everywhere stretching attack your ankles chase the red dot, hairball run catnip eat the grass sniff.</p>
  <p>Purr jump eat the grass rip the couch scratched sunbathe, shed everywhere rip the couch sleep in the sink fluffy fur catnip scratched.</p>
</main>
Turn an Image into a Link
이미지에 링크 걸기
설명
지금까지 배워왔던 바와 같이, 특정 엘레먼트를 a 엘레먼트로 감싸 링크를 넣을 수 있다.
이번엔 이미지를 a 엘레먼트로 감싸보자.
예는 다음과 같다.
<a href="#"><img src="https://bit.ly/fcc-running-cats" alt="Three kittens running towards the camera."></a>
데드 링크를 사용할 때는 href 속성에 해시 심볼 (#)을 사용하는 것을 잊지 말자.
문제
1. 이미지를 a 엘레먼트 (앵커)로 감싸보자.
2. 링크가 연결되면, 마우스 포인터를 이미지에 갖다대보자.
3. 아마도 일반 마우스 모양에서, 링크 클릭하는 마우스 포인터로 모양이 변할 것이다.
답변
<h2>CatPhotoApp</h2>
<main>
  <p>Click here to view more <a href="#">cat photos</a>.</p>
  <a href="#">
  <img src="https://bit.ly/fcc-relaxing-cat" alt="A cute orange cat lying on its back.">
  </a>
  <p>Kitty ipsum dolor sit amet, shed everywhere shed everywhere stretching attack your ankles chase the red dot, hairball run catnip eat the grass sniff.</p>
  <p>Purr jump eat the grass rip the couch scratched sunbathe, shed everywhere rip the couch sleep in the sink fluffy fur catnip scratched.</p>
</main>
Create a Bulleted Unordered List
글머리표 만들기
설명
HTML을 사용하여, 번호 없는 문단 목록 (unordered list) 혹은 글머리표 (bullet point)를 만들 수도 있다.
Unordered List의 각 단어 첫 글자를 사용하여, <ul></ul>을 오프닝과 클로징 엘레먼트로 사용한다.
이 안에 list의 첫 두 글자를 사용하여, <li></li>로 각 항목을 만들 수 있다.
<ul>
  <li>milk</li>
  <li>cheese</li>
</ul>
이런 식으로 말이다.
문제
1. 마지막 <p> 엘레먼트 두개를 지운다.
2. <p> 엘레먼트를 지운 자리에, 고양이가 좋아할 만한 것 3가지를 unordered list로 만들어 보자.
답변
<h2>CatPhotoApp</h2>
<main>
  <p>Click here to view more <a href="#">cat photos</a>.</p>

  <a href="#"><img src="https://bit.ly/fcc-relaxing-cat" alt="A cute orange cat lying on its back."></a>

  <ul>
    <li>강아지</li>
    <li>우유</li>
    <li>장난감</li>
  </ul>
</main>
<li></li> 엘레먼트에 아무거나 써도 된다.
Create an Ordered List
번호 목록 만들기
설명
HTML로 문단 번호 목록 (ordered list / numbered list)도 만들 수 있다.
Ordered List의 앞글자를 사용하여, <ol></ol> 엘레먼트를 사용한다.
이 안에 list 첫 두 글자를 사용하여, <li></li> 엘레먼트를 사용하면 된다.
<ol>
  <li>Garfield</li>
  <li>Sylvester</li>
</ol>
이런 식으로 말이다.
문제
1. 고양이가 싫어할 만한 것으로 3가지를 추가해보자.
2. Ordered List를 사용해서 말이다.
답변
<h2>CatPhotoApp</h2>
<main>
  <p>Click here to view more <a href="#">cat photos</a>.</p>

  <a href="#"><img src="https://bit.ly/fcc-relaxing-cat" alt="A cute orange cat lying on its back."></a>

  <p>Things cats love:</p>
  <ul>
    <li>cat nip</li>
    <li>laser pointers</li>
    <li>lasagna</li>
  </ul>
  <p>Top 3 things cats hate:</p>
  <ol>
    <li>강아지</li>
    <li>물</li>
    <li>냄새</li>
  </ol>
</main>
<li></li> 엘레먼트에 아무거나 써도 된다.
Create a Text Field
텍스트 필드 만들기
설명
이제는 웹 폼 (Web Form)을 만들어 보자.
<input> 엘레먼트는 유저(user)가 정보를 기입할 수 있는 손쉬운 방법 중 하나다.
예를 들어, 다음과 같은 방식으로 텍스트 인풋을 받을 수 있다.
<input type="text">참고로, 인풋 엘레먼트는 클로징 태그가 필요없다 (셀프 클로징).
문제
텍스트 타입의 인풋 엘레먼트를 리스트 아래에 만들어 보자.
답변
<h2>CatPhotoApp</h2>
<main>
  <p>Click here to view more <a href="#">cat photos</a>.</p>

  <a href="#"><img src="https://bit.ly/fcc-relaxing-cat" alt="A cute orange cat lying on its back."></a>

  <p>Things cats love:</p>
  <ul>
    <li>cat nip</li>
    <li>laser pointers</li>
    <li>lasagna</li>
  </ul>
  <p>Top 3 things cats hate:</p>
  <ol>
    <li>flea treatment</li>
    <li>thunder</li>
    <li>other cats</li>
  </ol>
  <input type="text">

</main>
Add Placeholder Text to a Text Field
텍스트 필드에 임시 텍스트 넣기
설명
플레이스홀더(placeholder) 텍스트에 대해 설명하려 한다.
<input> 엘레먼트로 만든 빈 칸이 있다고 생각해보자.
유저가 이 빈 칸에 뭔가를 적어넣어야 한다.
유저가 뭔가 적기 전에, 어떤 글이 들어갈지 임시로 보여주는 글을 플레이스홀더 텍스트라 한다.
예는 아래와 같다.
<input type="text" placeholder="this is placeholder text">문제
1. <input> 엘레먼트에 플레이스홀더 값을 추가해보자.
2. cat photo URL이라는 텍스트를 사용하자.
답변
<h2>CatPhotoApp</h2>
<main>
  <p>Click here to view more <a href="#">cat photos</a>.</p>

  <a href="#"><img src="https://bit.ly/fcc-relaxing-cat" alt="A cute orange cat lying on its back."></a>

  <p>Things cats love:</p>
  <ul>
    <li>cat nip</li>
    <li>laser pointers</li>
    <li>lasagna</li>
  </ul>
  <p>Top 3 things cats hate:</p>
  <ol>
    <li>flea treatment</li>
    <li>thunder</li>
    <li>other cats</li>
  </ol>
  <input type="text" placeholder="cat photo URL">
</main>
Create a Form Element
폼 만들기
설명
HTML만 갖고도, 서버에 데이터를 보내는 웹 폼 (Web Form)을 만들 수 있다.
<form></form> 엘레먼트에 액션(action)을 넣는 식이다.
예를 들면 이런 식이다.
<form action="/url-where-you-want-to-submit-form-data"></form>문제
1. <input> 엘레먼트를 <form></form> 엘레먼트로 감싸자.
2. action 속성을 추가하자. action="/submit-cat-photo"
답변
<h2>CatPhotoApp</h2>
<main>
  <p>Click here to view more <a href="#">cat photos</a>.</p>

  <a href="#"><img src="https://bit.ly/fcc-relaxing-cat" alt="A cute orange cat lying on its back."></a>

  <p>Things cats love:</p>
  <ul>
    <li>cat nip</li>
    <li>laser pointers</li>
    <li>lasagna</li>
  </ul>
  <p>Top 3 things cats hate:</p>
  <ol>
    <li>flea treatment</li>
    <li>thunder</li>
    <li>other cats</li>
  </ol>
  <form action="/submit-cat-photo">
  <input type="text" placeholder="cat photo URL">
  </form>
</main>
Add a Submit Button to a Form
폼에 제출버튼 만들기
설명
이번엔 폼(form)에 제출하기(submit) 버튼을 추가헤보자.
버튼을 클릭하면, 폼에 적은 데이터가 액션(action) 속성에 넣은 URL 주소로 보내지는 식이다.
예를 들면 이런 식이다.
<button type="submit">this button submits the form</button>문제
1. 폼에 가장 마지막 엘레먼트로 버튼 엘레먼트를 만들자.
2. 타입(type)은 submit이다.
3. 버튼의 텍스트는 Submit으로 작성하자.
답변
<h2>CatPhotoApp</h2>
<main>
  <p>Click here to view more <a href="#">cat photos</a>.</p>

  <a href="#"><img src="https://bit.ly/fcc-relaxing-cat" alt="A cute orange cat lying on its back."></a>

  <p>Things cats love:</p>
  <ul>
    <li>cat nip</li>
    <li>laser pointers</li>
    <li>lasagna</li>
  </ul>
  <p>Top 3 things cats hate:</p>
  <ol>
    <li>flea treatment</li>
    <li>thunder</li>
    <li>other cats</li>
  </ol>
  <form action="/submit-cat-photo">
    <input type="text" placeholder="cat photo URL">
    <button type="submit">Submit</button>
  </form>
</main>
Use HTML5 to Require a Field
특정 필드를 필수사항으로 만들기
설명
폼(form)의 특정 필드(field)를 작성하지 않으면, 제출이 되지 않게 할 수도 있다.
예를 들어, <input type="text"> 엘레먼트를 필요조건(required)으로 하기 위해서는, 속성(attribute)에 required를 넣어주면 된다.
<input type="text" required>문제
1. <input type="text"> 엘레먼트에 required 속성을 추가하자.
2. 시험 삼아, 텍스트 필드에 아무것도 적지 않고 제출(submit)을 눌러보자.
3. 어떤 알림이 뜨나?
답변
<h2>CatPhotoApp</h2>
<main>
  <p>Click here to view more <a href="#">cat photos</a>.</p>

  <a href="#"><img src="https://bit.ly/fcc-relaxing-cat" alt="A cute orange cat lying on its back."></a>

  <p>Things cats love:</p>
  <ul>
    <li>cat nip</li>
    <li>laser pointers</li>
    <li>lasagna</li>
  </ul>
  <p>Top 3 things cats hate:</p>
  <ol>
    <li>flea treatment</li>
    <li>thunder</li>
    <li>other cats</li>
  </ol>
  <form action="/submit-cat-photo">
    <input type="text" placeholder="cat photo URL" required>
    <button type="submit">Submit</button>
  </form>
</main>

required 속성을 넣지 않고 제출 버튼을 누르면, 이런 식의 알림이 뜬다.
Create a Set of Radio Buttons
라디오버튼 만들기
설명
여러 옵션 중 하나를 선택해야 한다면, 라디오 버튼 (radio button)을 사용하면 된다.
라디오 버튼은 <input> 엘레먼트의 타입으로 사용한다.
각 라디오 버튼은 <label></label> 엘레먼트으로 감싸준다. 이렇게 함으로써, 라벨 엘레먼트와 라디오 버튼이 서로 연결성이 생긴다.
여러 옵션 중 하나만 선택하게 만들기 위해서는, 라디오 버튼의 그룹을 만들어야 한다.
<input> 엘레먼트에 네임(name) 속성을 추가해주면 된다. 같은 그룹의 라디오 버튼은 전부 같은 네임을 사용해준다.
이렇게 같은 네임을 사용하면 그룹이 되고, 이 그룹 중에서 한 가지 옵션만 선택할 수 있게 되는 것이다.
라디오 버튼의 예이다.
<label>
  <input type="radio" name="indoor-outdoor">Indoor
</label>
베스트 프랙티스(best practice)를 하나 얘기하자면, <label> 엘레먼트와 <input> 엘레먼트 간 연결성을 더 제대로 만드는 방법이 있다.
<label> 엘레먼트에는 for 속성을 넣어주고, <input> 엘레먼트에는 id 속성을 넣어주는 것이다. 같은 이름을 사용해서 말이다.
예를 들자면 이렇다.
<label for="indoor">
  <input id="indoor" type="radio" name="indoor-outdoor">Indoor
</label>
문제
1. <form></form> 엘레먼트 안에, 2개의 라디오 버튼을 만들어 보자. 각 라디오 버튼은 <label></label> 엘레먼트로 감싸줘야 한다.
2. 옵션 1에는 Indoor, 옵션 2에는 Outdoor로 만든다.
3. 옵션 1, 2 모두 name 속성으로 indoor-outdoor로 정해주자. 이렇게 함으로써 한 그룹이 만들어진다. 그러면 한 개 옵션만 선택할 수 있게 된다.
답변
<h2>CatPhotoApp</h2>
<main>
  <p>Click here to view more <a href="#">cat photos</a>.</p>

  <a href="#"><img src="https://bit.ly/fcc-relaxing-cat" alt="A cute orange cat lying on its back."></a>

  <p>Things cats love:</p>
  <ul>
    <li>cat nip</li>
    <li>laser pointers</li>
    <li>lasagna</li>
  </ul>
  <p>Top 3 things cats hate:</p>
  <ol>
    <li>flea treatment</li>
    <li>thunder</li>
    <li>other cats</li>
  </ol>
  <form action="/submit-cat-photo">
    <input type="text" placeholder="cat photo URL" required>
    <label for="indoor">
      <input id="indoor" type="radio" name="indoor-outdoor">Indoor
    </label>
    <label for="outdoor">
      <input id="outdoor" type="radio" name="indoor-outdoor">Outdoor
    </label>
    <button type="submit">Submit</button>
  </form>
</main>

라디오 버튼은 그룹으로 만들어, 이렇게 한 개의 옵션만 선택하도록 할 수 있다.
Create a Set of Checkboxes
체크박스 만들기
설명
여러 옵션 중 두개 이상을 선택해야 한다면, 체크박스(checkbox)를 사용하면 된다.
체크박스는 <input> 엘레먼트의 타입으로 사용한다.
각 체크박스는 <label></label> 엘레먼트으로 감싸준다. 이렇게 함으로써, 라벨 엘레먼트와 체크박스 간 서로 연결성이 생긴다.
서로 관련성이 있는 체크박스는 같은 네임(name) 속성(attribute)을 사용해주면 된다.
베스트 프랙티스(best practice)를 하나 얘기하자면, <label> 엘레먼트와 <input> 엘레먼트 간 연결성을 더 제대로 만드는 방법이 있다.
<label> 엘레먼트에는 for 속성을 넣어주고, <input> 엘레먼트에는 id 속성을 넣어주는 것이다. 같은 이름을 사용해서 말이다.
예를 들자면 이렇다.
체크박스의 예이다.
<label for="loving"><input id="loving" type="checkbox" name="personality"> Loving</label>문제
1. 폼 안에 체크박스 옵션 3개를 만들어보자.
2. 각 체크박스는 <label></label> 엘레먼트로 감싸줘야 한다.
3. 모든 체크박스에는 personality라는 네임 속성이 있어야 한다.
답변
<h2>CatPhotoApp</h2>
<main>
  <p>Click here to view more <a href="#">cat photos</a>.</p>

  <a href="#"><img src="https://bit.ly/fcc-relaxing-cat" alt="A cute orange cat lying on its back."></a>

  <p>Things cats love:</p>
  <ul>
    <li>cat nip</li>
    <li>laser pointers</li>
    <li>lasagna</li>
  </ul>
  <p>Top 3 things cats hate:</p>
  <ol>
    <li>flea treatment</li>
    <li>thunder</li>
    <li>other cats</li>
  </ol>
  <form action="/submit-cat-photo">
  <label for="happy">
    <input id="happy" type="checkbox" name="personality">Happy
  </label>
  <label for="sad">
    <input id="sad" type="checkbox" name="personality">Sad
  </label>
  <label for="angry">
    <input id="angry" type="checkbox" name="personality">Angry
  </label>
    <label for="indoor"><input id="indoor" type="radio" name="indoor-outdoor"> Indoor</label>
    <label for="outdoor"><input id="outdoor" type="radio" name="indoor-outdoor"> Outdoor</label><br>
    <input type="text" placeholder="cat photo URL" required>
    <button type="submit">Submit</button>
  </form>
</main>

체크박스는 이런 식으로 2개 이상의 옵션을 선택할 수 있다.
Use the value attribute with Radio Buttons and Checkboxes
라디오버튼과 체크박스에 발류 속성 추가하기
설명
라디오 버튼 (radio button)이나 체크박스(checkbox)를 만들 때 조금 복잡한 것 같다는 생각이 들지 않는가?
<input> 엘레먼트에 네임(name) 속성(attribute)을 넣는 이유는 한 그룹으로 묶어주기 때문이라 했다.
그런데 <input> 엘레먼트에 id 속성은 꼭 넣어야 하는 건가?
<label></label> 엘레먼트에 for 속성은 왜 넣는 걸까?
게다가 이번에는 발류(value) 속성도 추가해야 한다.
폼(form)을 서브밋(submit) 버튼으로 제출하게 되면, 서버로 데이터를 보낸다.
이 때, 유저(user)가 선택한 라디오 버튼이나 체크박스의 옵션에 대한 값을 함께 보내야 한다.
이러한 값을 보내는데 바로 발류 속성을 사용한다.
예를 들면 아래와 같다.
<label for="indoor">
  <input id="indoor" value="indoor" type="radio" name="indoor-outdoor">Indoor
</label>
<label for="outdoor">
  <input id="outdoor" value="outdoor" type="radio" name="indoor-outdoor">Outdoor
</label>
위 예를 보면, 라디오 버튼을 2개 만든 것을 알 수 있다.
유저가 인도어(indoor)라는 옵션을 선택하고 서브밋 버튼을 누르면, 폼 데이터에 다음과 같은 정보를 포함된다.
indoor-outdoor=indoor
이는 <input> 엘레먼트 안에 있는 네임 속성과 발류 속성에서 온 것임을 알 수 있다.
발류 속성을 넣지 않는다면, 온(on)이라는 기본값(default)이 저절로 사용된다.
예를 들어보자. 유저가 폼을 제출하는데, 발류 속성이 없는 옵션을 선택했다. 그러면 다음과 같은 정보가 보내지는 것이다.
indoor-outdoor=on
결국 의미없는 정보가 되어버리는 것이다.
유저의 선택항목을 정확하게 파악할 수 있도록 발류를 넣어줘야 한다.
문제
1. 각 라디오버튼과 체크박스에 발류 속성을 넣어보자.
2. <input>에 있는 텍스트와 같은 텍스트를 사용하자.
3. 모든 스펠링은 소문자로 하도록 하자.
답변
<h2>CatPhotoApp</h2>
<main>
  <p>Click here to view more <a href="#">cat photos</a>.</p>

  <a href="#"><img src="https://bit.ly/fcc-relaxing-cat" alt="A cute orange cat lying on its back."></a>

  <p>Things cats love:</p>
  <ul>
    <li>cat nip</li>
    <li>laser pointers</li>
    <li>lasagna</li>
  </ul>
  <p>Top 3 things cats hate:</p>
  <ol>
    <li>flea treatment</li>
    <li>thunder</li>
    <li>other cats</li>
  </ol>
  <form action="/submit-cat-photo">
    <label><input type="radio" name="indoor-outdoor" value="indoor"> Indoor</label>
    <label><input type="radio" name="indoor-outdoor" value="outdoor"> Outdoor</label><br>
    <label><input type="checkbox" name="personality" value="loving"> Loving</label>
    <label><input type="checkbox" name="personality" value="lazy"> Lazy</label>
    <label><input type="checkbox" name="personality" value="energetic"> Energetic</label><br>
    <input type="text" placeholder="cat photo URL" required>
    <button type="submit">Submit</button>
  </form>
</main>
Check Radio Buttons and Checkboxes by Default
라디오버튼과 체크박스에 기본값 넣기
설명
라디오버튼(radio button)이나 체크박스(checkbox)에 기본값으로 옵션이 선택된 상태로 보여지게 할 수도 있다.
<input> 엘레먼트에 체크(checked) 속성을 사용하면 된다. 다음과 같이 말이다.
<input type="radio" name="test-name" checked>문제
1. 라디오버튼 옵션1에 체크가 되어 있게 만들어보자.
2. 체크박스 옵션1에 체크가 되어 있게 해보자.
답변
<h2>CatPhotoApp</h2>
<main>
  <p>Click here to view more <a href="#">cat photos</a>.</p>

  <a href="#"><img src="https://bit.ly/fcc-relaxing-cat" alt="A cute orange cat lying on its back."></a>

  <p>Things cats love:</p>
  <ul>
    <li>cat nip</li>
    <li>laser pointers</li>
    <li>lasagna</li>
  </ul>
  <p>Top 3 things cats hate:</p>
  <ol>
    <li>flea treatment</li>
    <li>thunder</li>
    <li>other cats</li>
  </ol>
  <form action="/submit-cat-photo">
    <label for="indoor"><input id="indoor" type="radio" name="indoor-outdoor" value="indoor" checked> Indoor</label>
    <label for="outdoor"><input id="outdoor" type="radio" name="indoor-outdoor" value="outdoor"> Outdoor</label><br>
    <label for="loving"><input id="loving" type="checkbox" name="personality" value="loving" checked> Loving</label>
    <label for="lazy"><input id="lazy" type="checkbox" name="personality" value="lazy"> Lazy</label>
    <label for="energetic"><input id="energetic" type="checkbox" name="personality" value="energetic"> Energetic</label><br>
    <input type="text" placeholder="cat photo URL" required>
    <button type="submit">Submit</button>
  </form>
</main>
라디오 버튼에는 Indoor 쪽에 체크가 되도록 하고, 체크박스에는 Loving에 체크가 되도록 만들면 된다.
Nest Many Elements within a Single div Element
엘레먼트 안에 엘레먼트 넣기
설명
<div></div> 엘레먼트에 대해 알아보자. 디비전(division) 엘레먼트라고도 부른다.
여러 방식으로 사용할 수 있는 다용도 엘레먼트라고 보면 된다.
아마 HTML 엘레먼트 중 가장 많이 사용하는 엘레먼트일 것이다.
문제
1. Things cats love와 Things cats hate에 있는 리스트를 모두 <div></div> 엘레먼트 하나로 감싸보자.
2. <p></p>로 감싼 Things cats love 위에 <div>태그를 넣는다.
3. <ol></ol> 로 감싼 Things cats hate 하단에 , </div> 클로징 태그를 넣는다.
답변
<h2>CatPhotoApp</h2>
<main>
  <p>Click here to view more <a href="#">cat photos</a>.</p>

  <a href="#"><img src="https://bit.ly/fcc-relaxing-cat" alt="A cute orange cat lying on its back."></a>
<div>
  <p>Things cats love:</p>
  <ul>
    <li>cat nip</li>
    <li>laser pointers</li>
    <li>lasagna</li>
  </ul>
  <p>Top 3 things cats hate:</p>
  <ol>
    <li>flea treatment</li>
    <li>thunder</li>
    <li>other cats</li>
  </ol>
</div>
  <form action="/submit-cat-photo">
    <label for="indoor"><input id="indoor" type="radio" name="indoor-outdoor" value="indoor" checked> Indoor</label>
    <label for="outdoor"><input id="outdoor" type="radio" name="indoor-outdoor" value="outdoor"> Outdoor</label><br>
    <label for="loving"><input id="loving" type="checkbox" name="personality" value="loving" checked> Loving</label>
    <label for="lazy"><input id="lazy" type="checkbox" name="personality" value="lazy"> Lazy</label>
    <label for="energetic"><input id="energetic" type="checkbox" name="personality" value="energetic"> Energetic</label><br>
    <input type="text" placeholder="cat photo URL" required>
    <button type="submit">Submit</button>
  </form>
</main>
Declare the Doctype of an HTML Document
HTML 문서의 타입 정하기
설명
지금까지는 HTML에 있는 특정 엘레먼트를 몇몇개 파악해 보았다.
하지만 HTML 문서(document)에 무조건적으로 포함해야 하는 엘레먼트도 있다.
이러한 엘레먼트는 HTML의 전체적인 구조를 만든다.
HTML 문서 가장 상단에 HTML의 어떤 버전을 사용하고 있는건지 표시해주어야 한다.
그러면 HTML 버전에 맞는 화면이 브라우저(browser)에 표시되는 것이다.
브라우저에 이 정보를 보내려면, 코드를 작성할때 가장 상단에 <!DOCTYPE>이라는 태그를 사용한다.
HTML5는 <!DOCTYPE html> 태그를 사용한다.
여기서 ! 표시와 DOCTYPE 대문자가 아주 중요하다. html은 대문자/소문자가 크게 상관 없다 (not case-sensitive).
나머지 html 코드는 <html></html> 엘레먼트로 감싸줘야 한다.
<html> 오프닝 태그는 <!DOCTYPE html> 바로 아래 표시하고, </html> 클로징 태그는 페이지 가장 하단에 표시한다.
예는 이러하다.
<!DOCTYPE html>
<html>
  <!-- 여기에 나머지 모든 html 코드를 넣는다. -->
</html>
문제
1. html5 버전에 맞는 태그로 html 페이지를 시작해보자.
2. <html></html> 오프닝 태그와 클로징 태그를 모두 넣는다.
3. <h1></h1> 태그도 넣어보자. 텍스트는 아무거나 적어도 된다.
답변
<!DOCTYPE html>
<html>
    <h1>와우!</h1>
</html>
Define the Head and Body of an HTML Document
HTML 문서의 헤드와 보디
설명
html 문서의 구조를 짜는데 사용하는 태그들이 더 있다.
<html></html> 태그 안에, <head></head> 태그와 <body></body> 태그로 나눌 수 있다.
페이지에 대해 설명하는 정보는 <head></head> 태그에 넣는다.
유저가 페이지 화면을 확인할 때 보는 컨텐츠는 <body></body> 태그에 넣는다.
<link></link>, <meta></meta>, <title></title>, <style></style>과 같은 메타데이터(metadata) 엘레먼트는 <head></head>에 넣는다.
예를 들면 이러하다.
<!DOCTYPE html>
<html>
  <head>
    <!-- metadata elements -->
  </head>
  <body>
    <!-- page contents -->
  </body>
</html>
문제
1. <head></head>와 <body></body> 태그를 넣어보자.
2. <title></title> 태그는 <head></head> 태그로 감싸주자.
3. <h1></h1>과 <p></p> 태그는 <body></body> 태그로 감싸주자.
답변
<!DOCTYPE html>
<html>
  <head>
  <title>The best page ever</title>
  </head>
  <body>
  <h1>The best page ever</h1>
  <p>Cat ipsum dolor sit amet, jump launch to pounce upon little yarn mouse, bare fangs at toy run hide in litter box until treats are fed. Go into a room to decide you didn't want to be in there anyway. I like big cats and i can not lie kitty ipsum dolor sit amet, shed everywhere shed everywhere stretching attack your ankles chase the red dot, hairball run catnip eat the grass sniff. Meow i could pee on this if i had the energy for slap owner's face at 5am until human fills food dish yet scamper. Knock dish off table head butt cant eat out of my own dish scratch the furniture. Make meme, make cute face. Sleep in the bathroom sink chase laser but pee in the shoe. Paw at your fat belly licks your face and eat grass, throw it back up kitty ipsum dolor sit amet, shed everywhere shed everywhere stretching attack your ankles chase the red dot, hairball run catnip eat the grass sniff.</p>
  </body>
</html>
HTML을 끝마치며...
이렇게 프리코드캠프(freeCodeCamp) Basic HTML and HTML5 부분이 끝났다.
내가 이해할 수 있는 방식으로 최대한 쉽게 작성해 봤는데, 다른 사람에게 도움이 될런지 모르겠다.
아무쪼록 영어 때문에 이해할 수 없었던 부분이 조금이나마 채워지면 하는 바램이다.
다음은 Basic CSS 부분이다.
CSS 배우러 가기
'freeCodeCamp 프리코드캠프 > 1 반응형 웹 디자인' 카테고리의 다른 글
| 1-6 CSS 플렉스 박스 - CSS Flexbox (0) | 2020.08.17 |
|---|---|
| 1-5 반응형 웹 디자인 원칙 - Responsive Web Design Principles (0) | 2020.07.24 |
| 1-4 접근성 - Applied Accessibility (0) | 2020.07.21 |
| 1-3 시각 디자인 - Applied Visual Design (0) | 2020.07.01 |
| 1-2 CSS (0) | 2020.05.09 |


